Outdoor electrical outlets can help improve the usability and accessibility of your outdoors. Adding outdoor outlets in strategic locations enhances the functionality of your home, whether plugging in garden tools, holiday lights, or outdoor appliances. However, it is crucial to install them properly to achieve safety, fulfillment of electric standards, and durability of their work. This guide will inform you to install an outdoor electrical outlet, which is recommended to the DIY enthusiast or homeowner to improve their outdoors power outlets.
Planning Your Outdoor Outlet Installation
An efficient and safe installation of the outdoor electrical outlets requires proper planning. This step will help you make the best choice of location, learn the safety codes and include the required equipment and materials and then start the project. Risk is minimized through careful preparation, and it will make the installation process a smooth one.
Choosing the Right Location
Before choosing a location to install your outdoor outlet, you should look at its convenience and safety. Select a place that you can use with ease either on a regular basis like close to patios, decks or also on the garden working sections. Ensure that the place is not near any source of water such as sprinklers or pools in order to reduce the way of electrical shocks.
Also, the outlets should be in accordance with local electrical codes, and often local electrical codes specify that outdoor outlets be mounted a certain distance, say 12 to 18 inches, above ground level. Locate the outlet in a location as much as possible that it is not directly exposed to the rain, and be able to view it easily in order to have it inspected or possibly maintained.
Safety Codes and Electrical Requirements
Outside outlets should be equipped with very high standards of safety in order to safeguard both persons and properties. The National electrical code (NEC) requires outdoor receptacles to be GFCI protected. This will automatically cut power in case a ground fault or electrical leakage occurs eliminating shocks.
Other typical specifications are the use of weatherproof outlet boxes and in-use covers that guard the outlet with or without a plug. Outdoor wiring should be outdoor-grade, and frequently be enclosed in conduit to prevent cable damage and weather. Lastly, you should always check on your local codes because they may include extra or stricter rules.
Tools and Materials You’ll Need
Preparation Before beginning, you need to have all the tools and materials ready:
- GFCI outdoor electrical outlet.
- Weatherproof outlet box and cover
- Outdoor‑suitable electrical cable (copper, gauge per local code)
- Electrical conduit (PVC or metal)
- Wire strippers, screwdrivers, drill and bits
- Voltage tester
- Wire nuts/connectors
- Outdoor‑grade sealant or caulking
Step-by-Step Guide to Installing an Outdoor Outlet
The availability of all the equipment is time-saving, quality, and safety preserving.
1. Switch Off Power: Turn-off the circuit breaker of the area you are working. Test with a voltage checker that electricity is not passing through the wires.
2. Mark and cut a hole in the exterior wall: Mark and cut a hole in the exterior wall to fit the outlet box.
3. Run Wiring: Run the outside-rated cable and through the wall to the new outlet point, preferably with protective conduit.
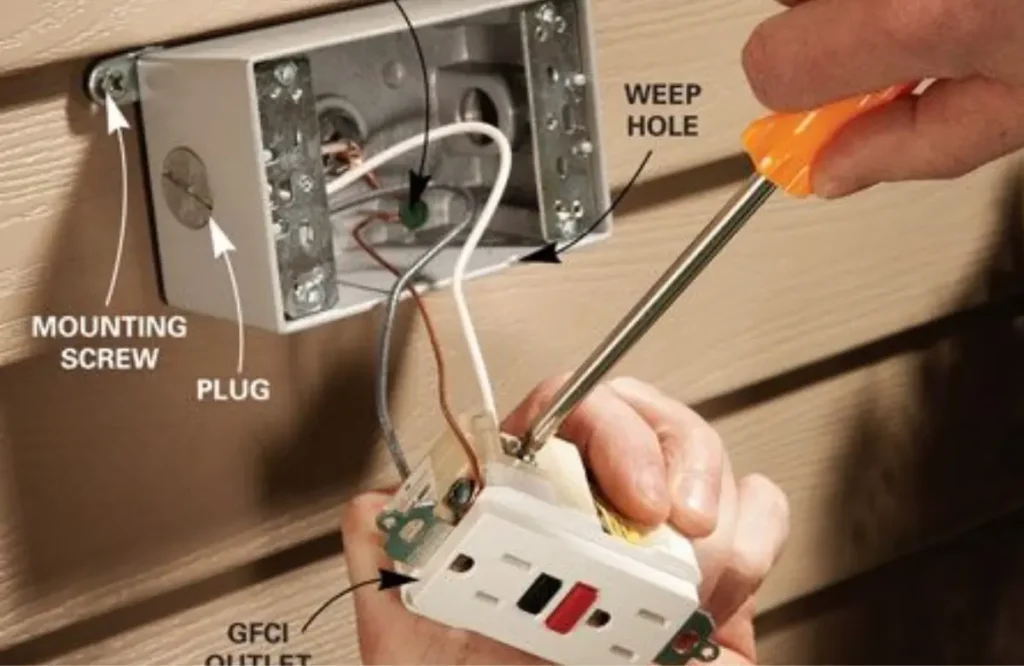
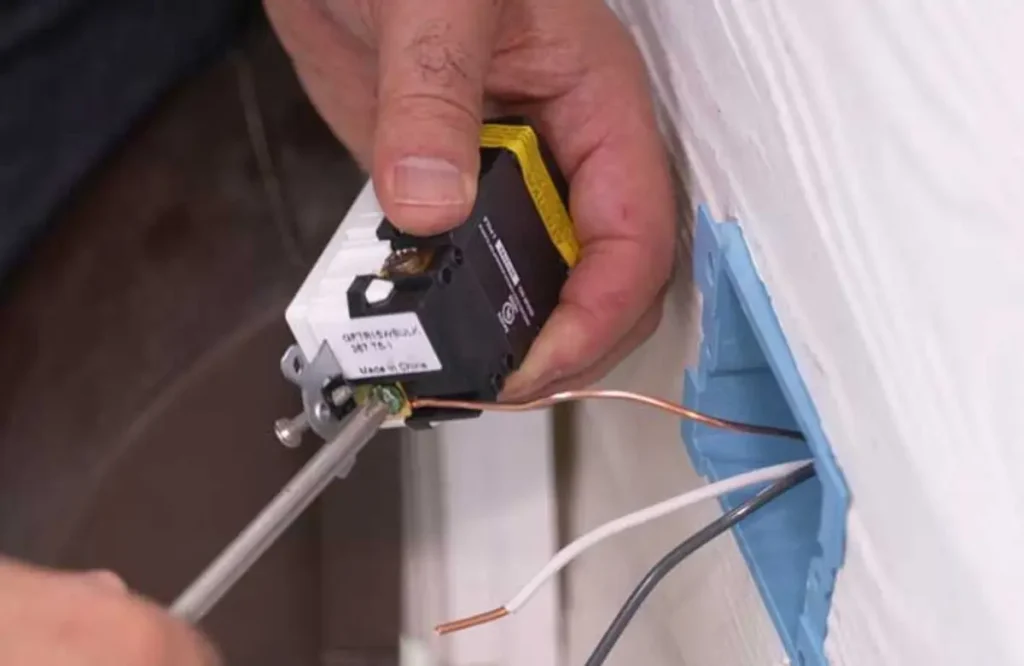
4. Install Outlet: Install wires to the GFCI outlet, keeping the proper polarity, i.e. hot (black) to brass, neutral (white) to silver, ground (green or bare copper) to ground.
5. Install Outlet Box and Outlet: screw the outlet into the weatherproof box, then firmly screw the box to the wall.
6. Install Weatherproof cover: You can install the in-use cover to safeguard the outlet against moisture at all times.
7. Check the Outlet: Reconnect Power and test with a plug-in device or voltage tester. Press the GFCI test button to make sure that power is cut off and it is reset properly.
These steps will make you a dependable and safe outdoor outlet that will last you several years.
Cost of Installing Exterior Wall Outlets
Installation costs can be different based on complexity, material, location and whether you do it yourself or hire someone. By knowing these factors, you are able to budget properly.During the installation of exterior wall outlets, the cost is determined as per the following:
| Aspect | DIY Installation | Hiring a Licensed Electrician |
| Average Cost | $50 – $100 (materials only) | $180 – $350 (labor & materials) |
| Labor | No labor cost, requires skill | $50 – $100 per hour labor rate |
| Safety | Risk if inexperienced | Safer, meets code requirements |
| Code Compliance | Must ensure compliance yourself | Guaranteed code compliance |
| Time Commitment | Longer, especially for novices | Faster, efficient installation |
| Warranty / Insurance | No warranty or insurance coverage | Work guaranteed and insured |
| Tools & Materials | May need to purchase tools | Included with professional service |
Things to Avoid While Installing Outdoor Outlets and Fixes
Attention to detail is a key measure to guarantee safety and durability and compliance to the code. The following are the typical pitfalls to be guarded against and workarounds:
1. Incorrect Outlet Box Installation
Mistake: The box may fail or allow moisture to enter it unless it is installed at the right height and secured to the wall; installing the box of the incorrect size may overcrowd the wires and raise the risk of fire.
Fix: Adhere to local building codes so that the box is placed 12 to 18 inches above ground level. Put the appropriate weatherproof box in place and fix it to the wall or structure.
2. Neglecting Weatherproofing
Mistake: The outlet will be exposed to moisture, corrosion, and dangers because of not sealing the box or using non-weatherproof covers.
Fix: outdoor-rated, in-use covers. Seal edges with waterproof caulking and position outlets in sheltered areas when possible.
3. Skipping GFCI Protection
Mistake: Standard outlets should not be installed in wet places, as this can cause electric shocks, and is against codes.
Fix: Outdoor installations should always be GFCI; these outlets will close instantaneously should a ground fault be detected.
4. Improper Wiring Connections
Mistake: Loose, backward, or unsecured wiring causes power loss, short circuits, or fires.
Fix: Strip wires to approximately three-quarters of an inch, loop them clockwise on screws to ensure tightness and apply wire nuts or connectors to hold ends together.
5. Wiring Outside Electrical Boxes
Mistake: Splicing or connecting wires outside the box is not safe and it is against the code.
Fix: Connect all in approved outlet box. Where retrofitting in finished walls, use old work remodel boxes.
6. Using the Wrong Wire Size
Mistake: Over-heated wire is too small and causes a breaker trip; too large wastes money.
Fix: Adjust gauge to circuit amperage–14 -gauge for 15 amps, 12 -gauge for 20 amps. Consult local codes or a professional when uncertain.
7. Inadequate Cable Securing and Support
Mistake: It is an unsecured cable or unsecured cable run without conduit that opens the wires to abrasion, shorts, and code violations.
Fix:Use proper conduit for exposed outdoor wiring and secure cables with clamps at the box and along runs.
8. Ignoring Permits and Inspections
Mistake: It may result in fines or unsafe configurations when the set up or commencement is initiated without the necessary permits or inspections.
Fix: Your local building department has the information on the permit requirements and inspections that can be made to check code compliance.
Conclusion
Outdoor electrical outlets increase the outdoor living areas. Do it yourself or hire a professional: be safe, code-compliant, and weatherproofed to ensure long-term reliability. Correct planning, appropriate equipment and compliance with the local laws will ensure that you can reap the rewards of outdoor power safely and without needless hassle.
Do you want outdoor outlets installation or other upgrades? All Star Construction Group offer you a proper, on-time and cost-efficient installation. Call us now to consult or estimate free and turn on your outdoor space safely and stylishly.
FAQs
What is a GFCI outlet, and why is it required outdoors?
A GFCI outlet is a device that identifies electrical faults and switches off power right away to avoid shocks and make outdoor outlets safer.
Can I install an outdoor outlet myself?
In case you possess electrical experience and adhere to the safety codes, it can be done yourself. Employing a certified electrician will be safe and in line.
How high should outdoor outlets be installed?
Outlets are usually required to be mounted between 12 and 18 inches above the ground or deck level by codes.
Are weatherproof covers necessary?
Yes. Outlets are covered with weatherproof or in-use covers to keep water and debris out and prolongs their usefulness and safety.
Will installing outdoor outlets require permits?
A lot of local codes have permits and inspections on outdoor electrical work. Before you begin, check with your local building department.